The 12 principles of animation, with examples
Updated
The 12 principles of animation are the rules of thumb that make drawn and digital characters feel alive: they have weight, they think before they move, and their motion follows the way real things move. They come from Disney animators Ollie Johnston and Frank Thomas, who set them out in their 1981 book The Illusion of Life: Disney Animation (Wikipedia).
Here's each principle in a few plain sentences, a diagram for the ones you can see best in a picture, and how to put each one to work in Animperia. You don't need to master all twelve at once. Squash and stretch, timing and slow in and out will improve your animation the fastest.
1. Squash and stretch
Things change shape as they move: a ball flattens when it hits the ground and stretches when it falls fast. Squash and stretch gives weight and flexibility, and the golden rule is to keep the volume the same, so a squashed ball gets wider as it gets flatter.
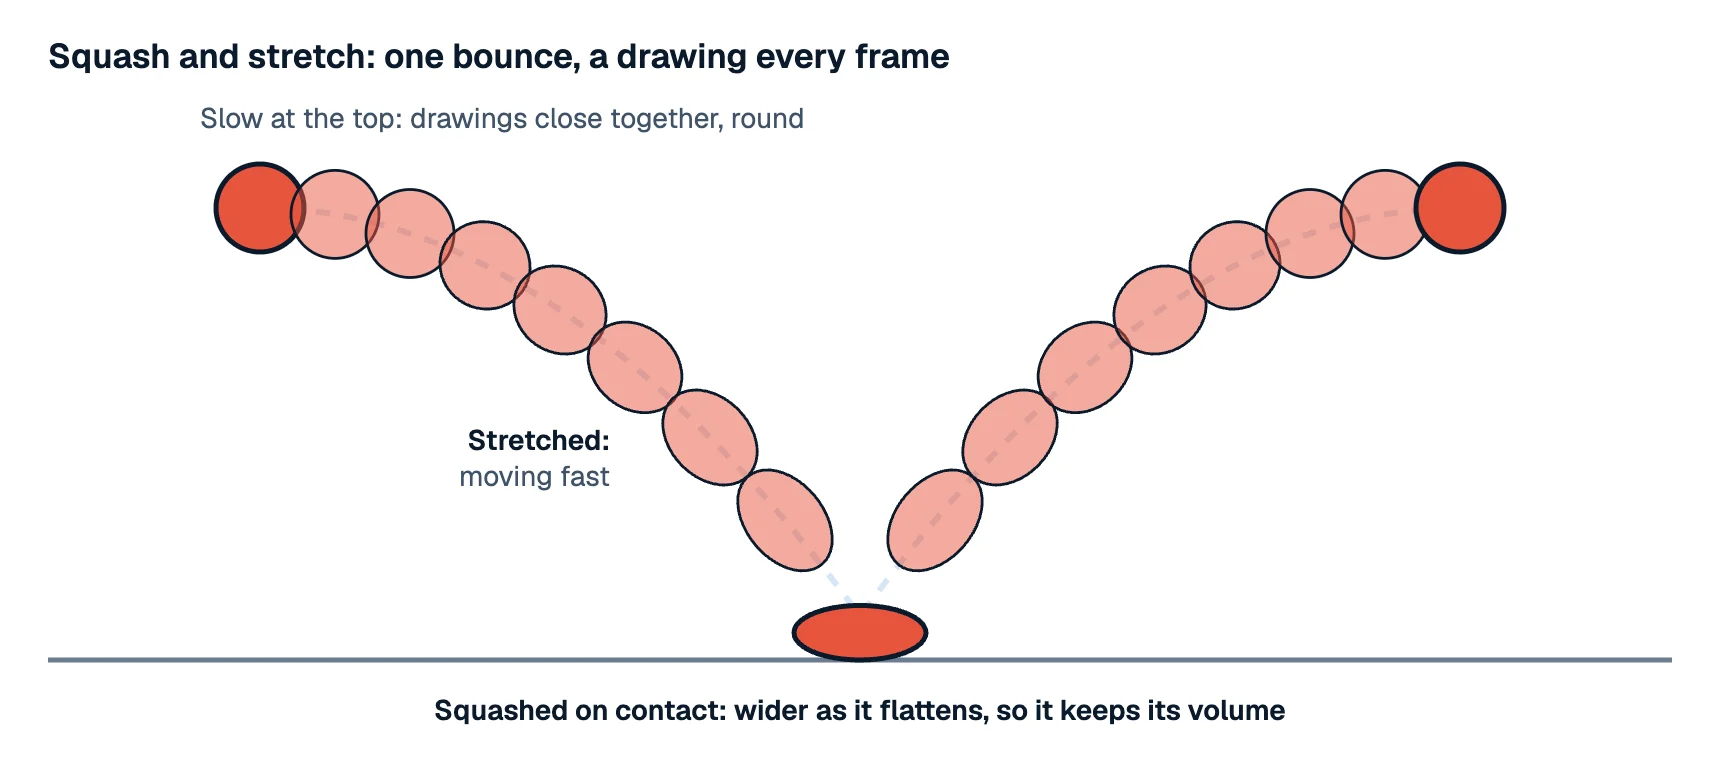
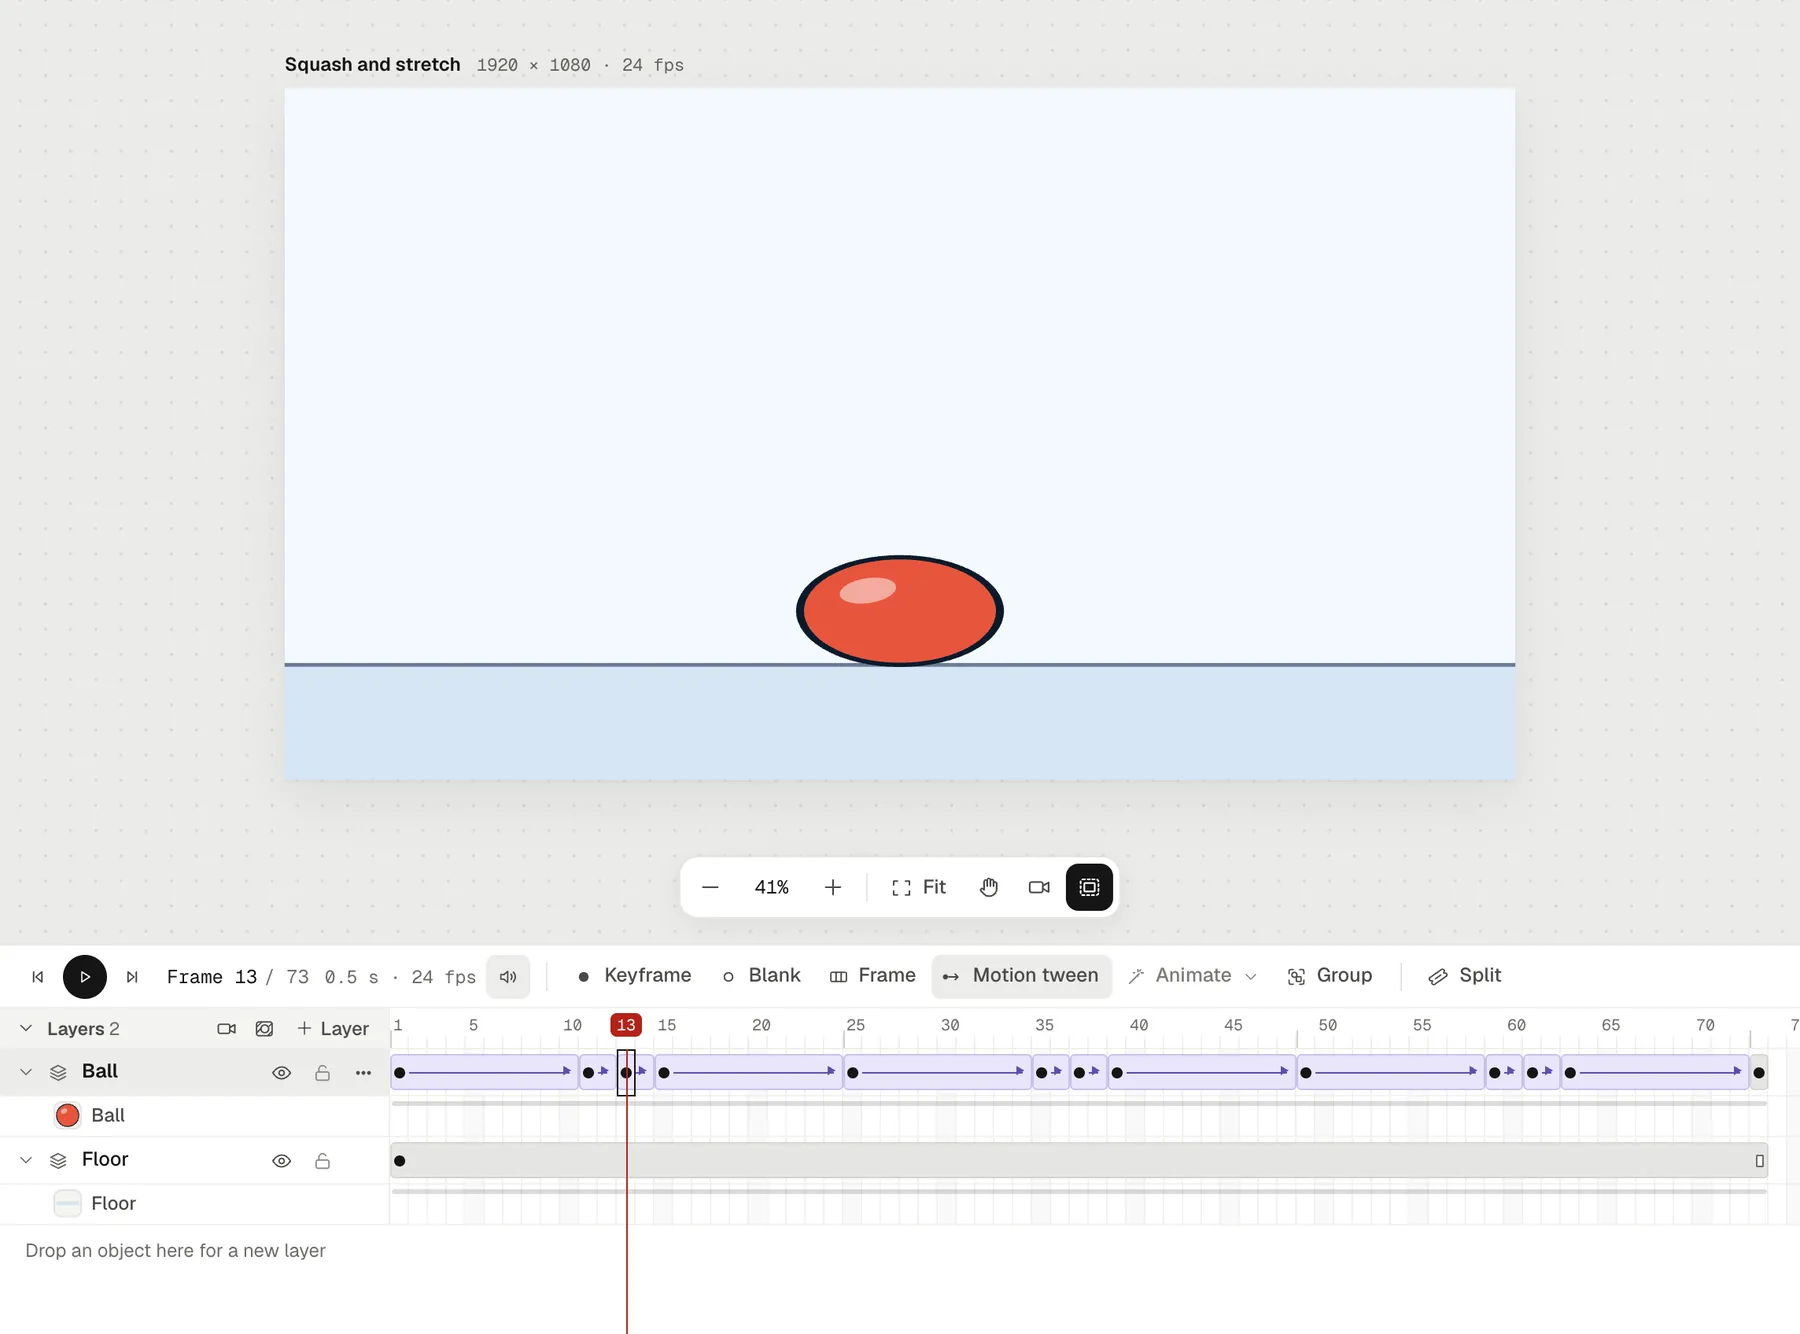
In Animperia: on the scene's timeline, put a keyframe on the frame the ball touches the ground and make it wider and shorter (unlink W and H in Properties, or drag a side handle), then stretch it a frame before and after. Motion tweens carry the shape change along with the move. In a character's animation, each part has its own Scale X and Scale Y on every frame, so a head can squash as the character lands.
2. Anticipation
Before a big action comes a small move the other way: a crouch before a jump, a wind-up before a throw, a breath before a shout. Anticipation tells the audience something is about to happen, so they don't miss it.
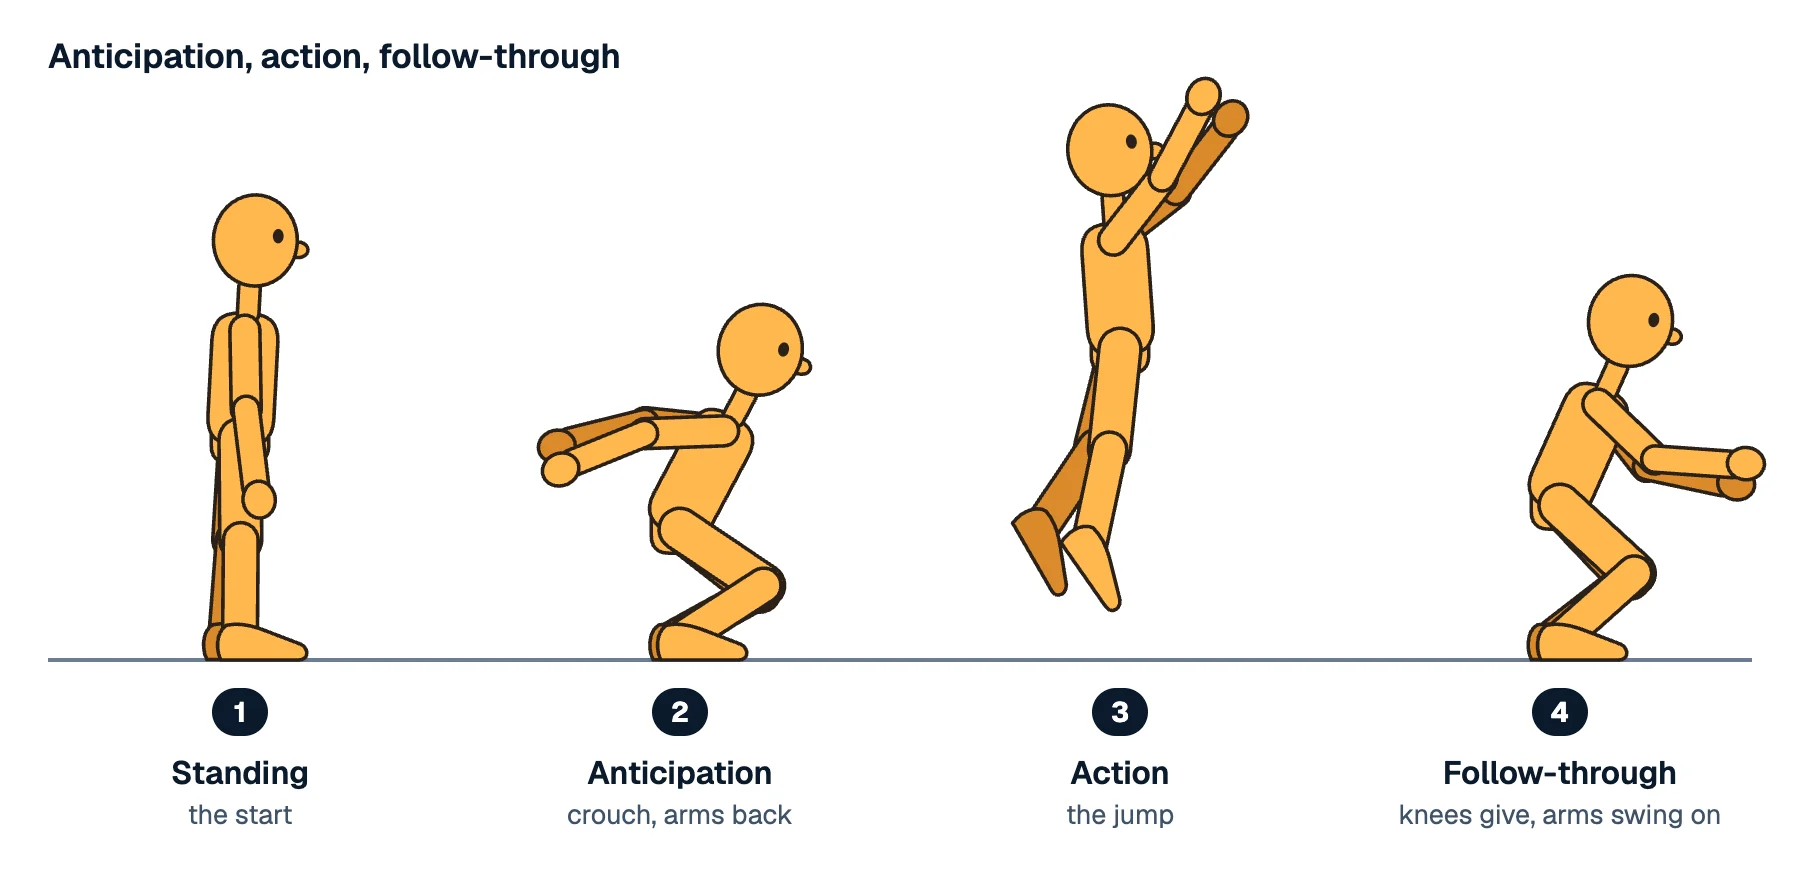
In Animperia: pose the anticipation as its own key a few frames before the action. If the jump starts on frame 12, crouch on frame 6 and hold it for a frame or two.
3. Staging
Present one idea at a time, as clearly as you can. Choose where the camera is, what's in focus and what the character's silhouette says, so the viewer looks where you want them to look.
In Animperia: add a Camera layer to frame and push in on what matters, put the important character on a layer in front, and keep backgrounds quieter than the action. The frame button in the stage's toolbar hides everything outside the canvas, so you see the shot as it will render.
4. Straight ahead action and pose to pose
There are two ways to animate a scene. Straight ahead means drawing frame after frame from the start, which gives fluid, surprising motion: good for fire, water and wild action. Pose to pose means planning the key poses first and filling in the in-betweens afterward, which keeps timing and acting under control. Most animators combine them.
In Animperia: go straight ahead on a drawing layer, frame by frame with the brush and the onion skin. Go pose to pose on a character's animation: pose the keys with Pivots, and the frames between them fill in as you go.
5. Follow-through and overlapping action
Not everything stops at once. When a character stops, the hair, the tail, the coat and the loose arms keep going a little and settle after (follow-through), and different parts move at slightly different times (overlapping action). It's what makes a move feel physical instead of mechanical.
In Animperia: offset the parts. Let the body hit its key, then key the arm or the tail two or three frames later, overshooting a little before it settles.
6. Slow in and slow out
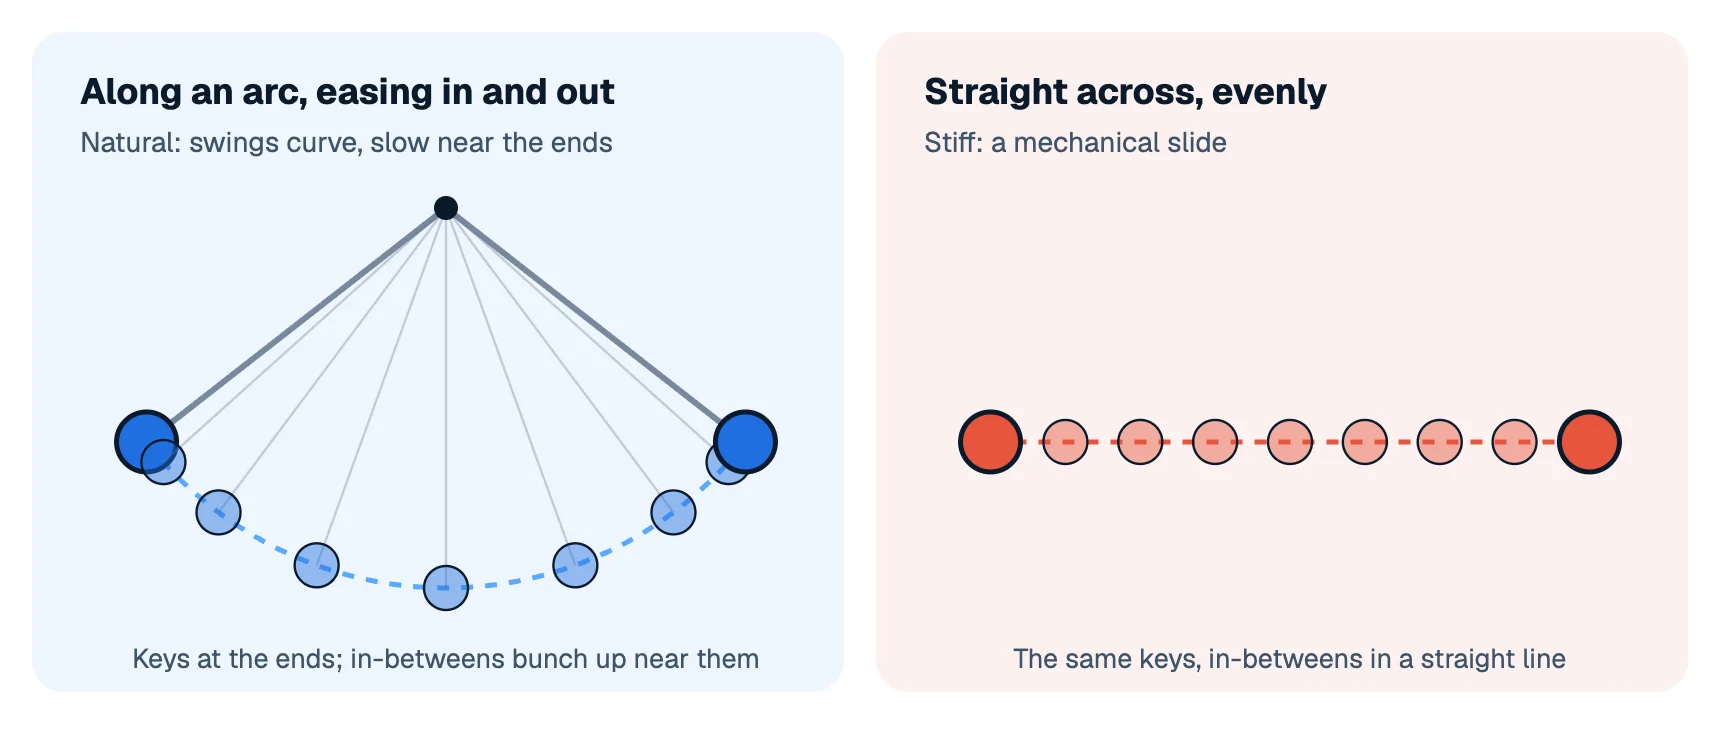
Most things accelerate out of a pose and decelerate into the next one. So the in-betweens bunch up near the keys and spread out in the middle of the move. Slow in and slow out is what easing means in software.
In Animperia: right-click a motion tween and choose Ease in (speeds up), Ease out (slows down) or Ease in and out. In a character's animation, the frames around a changed pose already ease in and out. What is tweening shows the four easings side by side.
7. Arcs
Living things move along curves, not straight lines: a head turning dips in an arc, an arm swings from the shoulder, a thrown ball travels in a parabola. Straight paths read as robotic.
In Animperia: a character's limbs turn around their joints, so posed motion already travels on arcs. Motion tweens in a scene move in straight lines between keyframes, so for a curved path add a keyframe or two along the curve. Check your arcs with the onion skin.
8. Secondary action
A smaller action that supports the main one: a character walks and swings a bag, talks and taps their fingers, reads and nods. It adds life, as long as it doesn't steal attention from the main action.
In Animperia: play two animations on one character at once. A walk and a blink combine, and so do a talk and a fidget, each as its own clip on the timeline.
9. Timing
The number of frames an action takes decides how it feels: the same move over 6 frames is a snap, over 24 frames a slow, heavy gesture. Timing also shows weight and mood: a light ball bounces quickly, a heavy one slowly.
In Animperia: change an animation's length to retime it, give one clip its own duration in Options… to play faster or slower in one scene only, and drag keyframes along the timeline. The project's frame rate sets how finely you can time things. See animating on twos for how ones, twos and threes change the feel.
10. Exaggeration
Push things further than real life: a bigger squash, a wider smile, a longer anticipation. Exaggeration isn't about being wild. It's about making the idea of a pose or an emotion read instantly.
In Animperia: push the key poses, then reshape shapes on a frame for extreme expressions: double-click a brow or a mouth in an animation and drag its points.
11. Solid drawing
Draw things as if they have volume, weight and balance in three dimensions, even in a flat style. Avoid "twins", where both arms or legs do exactly the same thing.
In Animperia: keep your characters on model with variations of one character, such as a front view and a side view, and swap them on the stage with Change variation…, which keeps the size and the spot. Break symmetry when you pose.
12. Appeal
The audience should want to watch the character, hero or villain. Appeal comes from clear, readable design: simple shapes, a strong silhouette and personality in the poses.
In Animperia: try your design ideas as variations side by side before you animate, and test the silhouette by tinting the character dark with Tint in Properties.
Putting the principles to work
Start with a bouncing ball (squash and stretch, timing, slow in and slow out, arcs), then a pendulum (follow-through), then a walk cycle, which uses nearly all of them. Make each one short, watch it on loop, and fix one thing at a time.
Questions about the 12 principles of animation
Who created the 12 principles of animation?
Ollie Johnston and Frank Thomas, two of Disney's lead animators, described them in The Illusion of Life: Disney Animation, published in 1981 (Wikipedia).
Which principle should I learn first?
Squash and stretch and timing, through the bouncing ball exercise. Slow in and slow out comes with it.
Do the 12 principles apply to cut-out and rigged animation?
Yes. Rigs make arcs easy and squash and stretch harder, so lean on drawn touches, reshaped shapes and scale changes for the shapes, and on timing and overlap for the rest.
Do the principles apply to 3D animation?
Yes, all of them. Squash and stretch, arcs and timing work the same way in 3D, even if the tools are different.