How to rig a 2D character, step by step
Updated
Rigging a 2D character means cutting it into parts that turn at joints, so you can pose it instead of redrawing it. A good rig takes an hour and saves you days. A sloppy one fights you in every shot: elbows that crack open, hands that drift off their wrists, a head that spins around the wrong point.
This guide has two halves. The first is advice that holds in any tool, from paper puppets to big desktop studios. The second rigs a character from start to finish in Animperia, a 2D animation studio in your browser, with a screenshot of each step. The character is Juno, a simple figure we made for this guide and imported as SVG.
Before you rig: plan the parts
Cut where the body bends
Every place the character bends needs its own part. For a person that’s usually:
- a body, or body and hips if the character bends at the waist;
- a head, and separate eyes, brows and a mouth if it blinks, frowns or talks;
- three parts per arm: upper arm, forearm, hand;
- three parts per leg: thigh, shin, foot.
That’s about 14 parts for a full figure, plus the face. Resist adding more. Fingers, toes and a neck that bends twice are rarely worth it, and every extra part is one more thing to pose on every key.
Decide what hangs from what
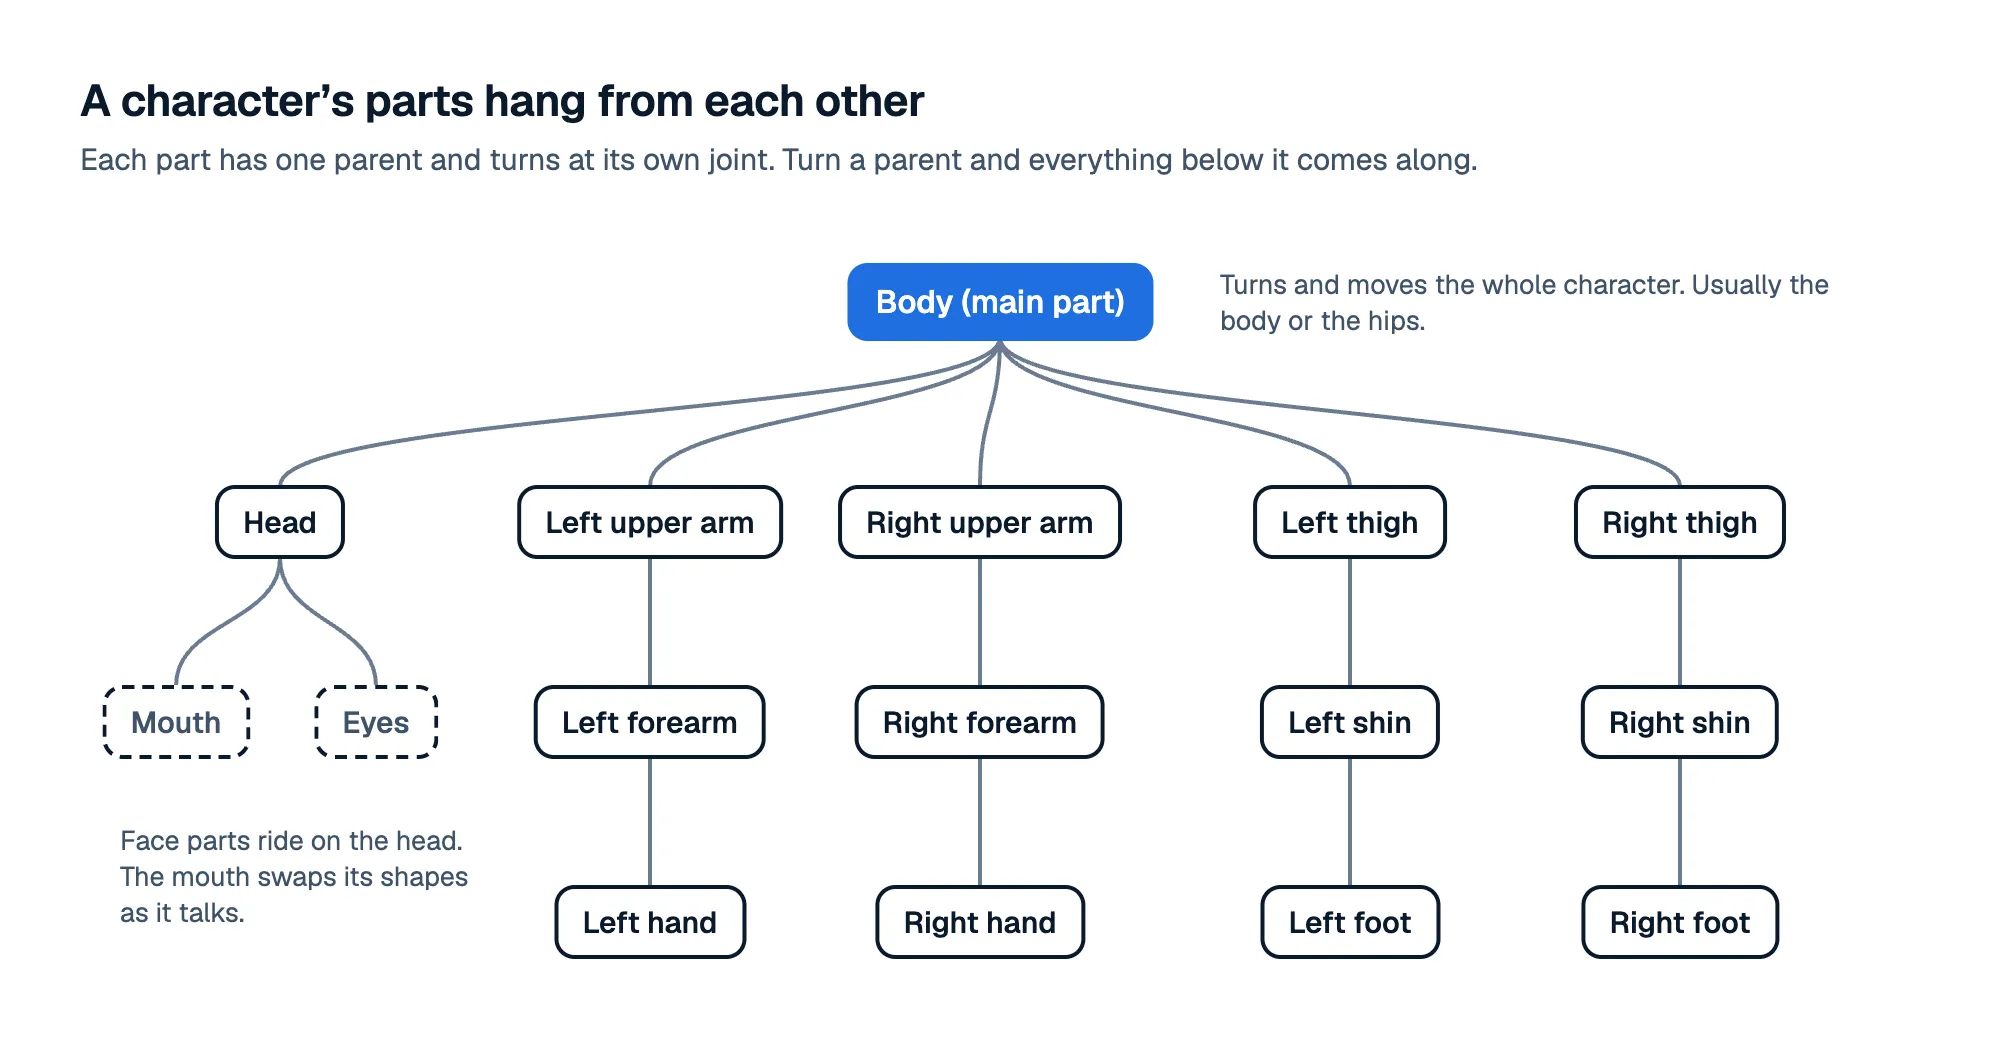
Parts hang from each other in a tree. Turn a parent and everything below it comes along: lift the upper arm and the forearm and hand go with it. The main part, usually the body or the hips, moves the whole character.
Put each joint where the part really turns
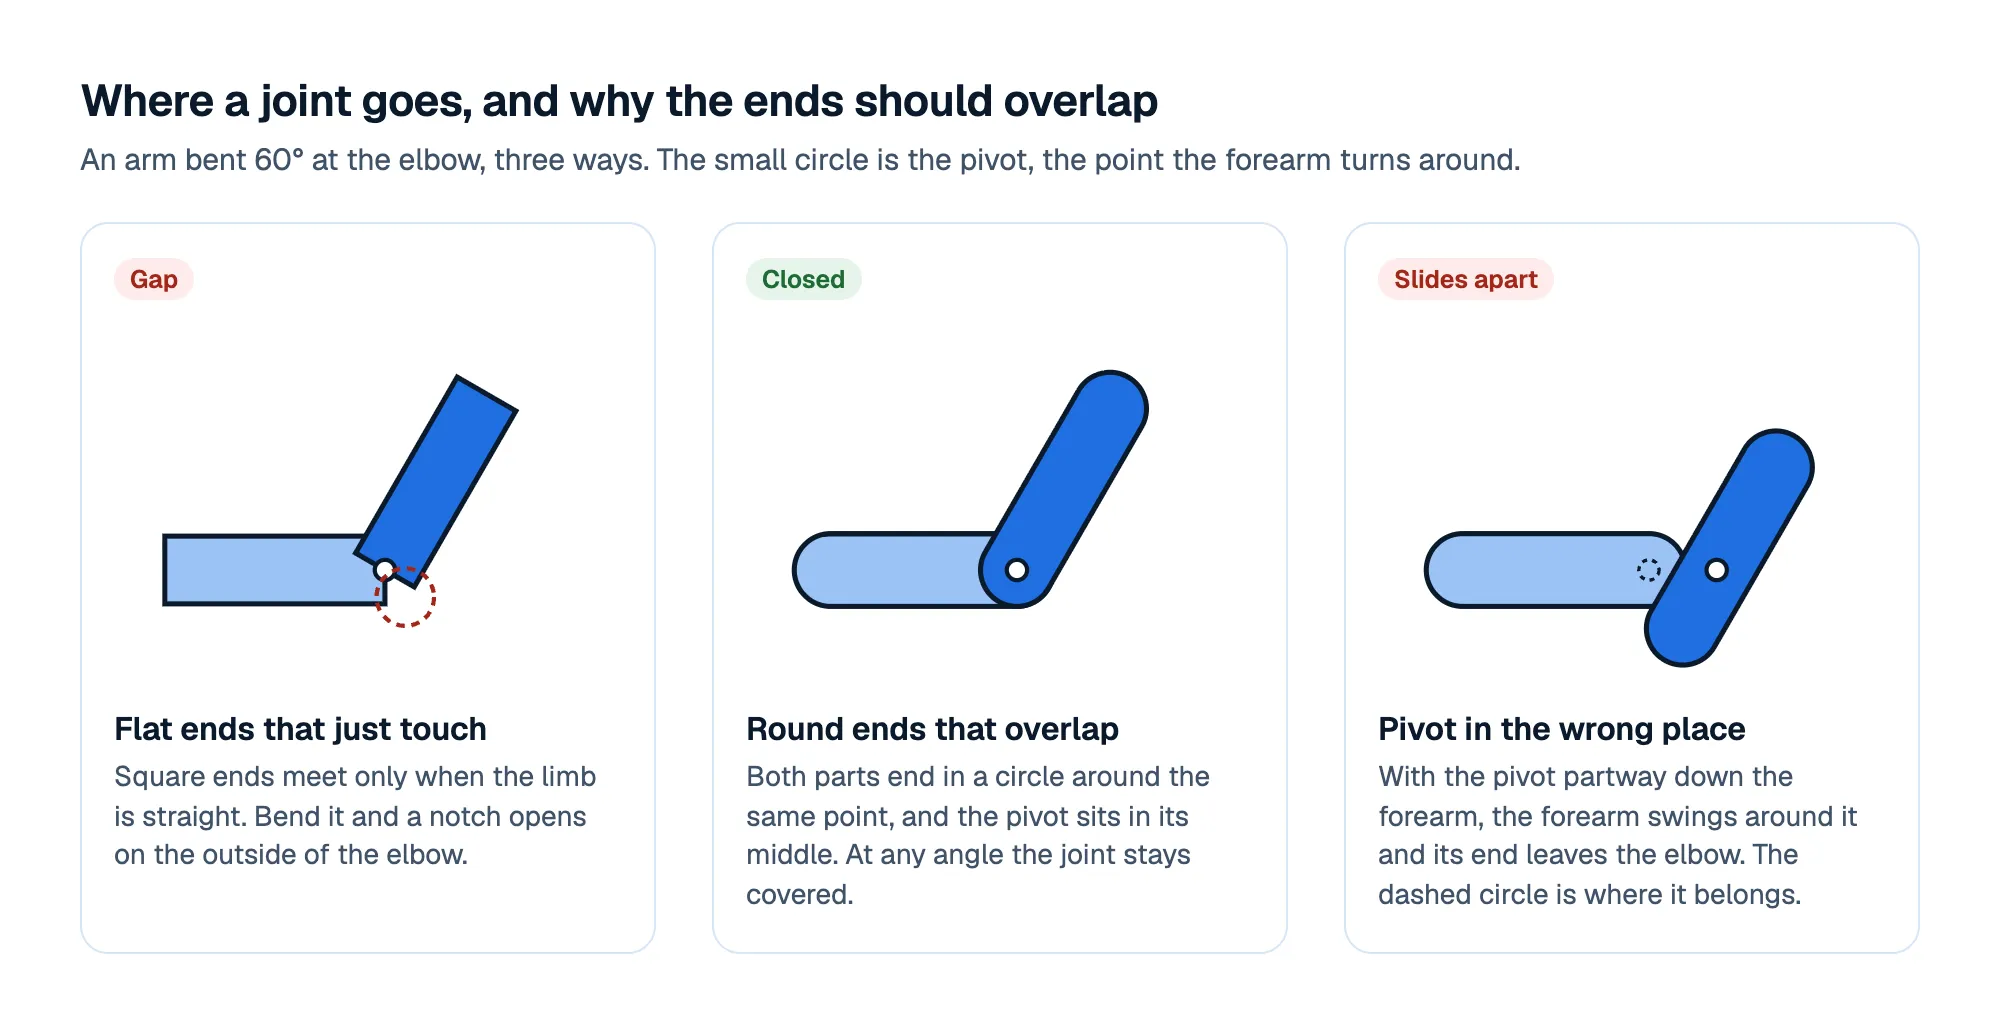
A joint is the point a part turns around, its pivot. Put it at the center of the real joint: the middle of the shoulder, not its edge; the middle of the elbow; the wrist; the hip socket; the knee; the ankle; the base of the neck. If a pivot is off, the part swings around the wrong point and its end slides away from its neighbor.
Overlap the ends, and make them round
Where two parts meet, end both in a circle around the joint and let them overlap. A round end turning inside another round end always covers the joint. Square ends that just touch look fine when the limb is straight and open a notch the moment it bends.
Draw it in a neutral pose
Draw the character standing straight, arms a little away from the body and legs slightly apart. Every joint is then visible and nothing overlaps by accident, so the parts are easy to cut and the joints easy to place. This drawing becomes the rest pose that every animation starts from.
Name the parts consistently
Names are for you in six months’ time. Use the same pattern everywhere: Left upper arm, Left forearm, Left hand. Decide once whether left means the character’s own left or the left of the picture, and stick to it. In Animperia, the name also sets the part’s kind, which decides how posing treats it, so a part named Left forearm is a forearm and a part named Mouth can talk.
Mind the draw order
Parts are stacked. The arm on the far side of the body goes behind it, the near arm in front. Hands usually sit in front of their forearms, so the round wrist end hides the joint. Sort this out before you animate, not after.
Rig a character in Animperia
You’ll need an Animperia account, which is free during the beta, and a desktop browser on Windows, Mac or Linux. We test it in Google Chrome.
Step 1: draw or import the character
In the editor’s library, click + and pick Object. On the Hands-on tab you have two ways in:
- Blank canvas opens the drawing editor on an empty page. Draw the character with the pen, the brush, lines, ellipses and rectangles.
- SVG file imports a drawing from Illustrator, Inkscape or Figma. Each group in the file becomes a group in Animperia, under the name it had, so put each body part in a group of its own before you export.
We imported juno.svg, with one group per part, and left This is a character unticked so we could make the parts by hand. Ticked, the file’s groups become parts straight away, hanging from each other the way the file nests them.
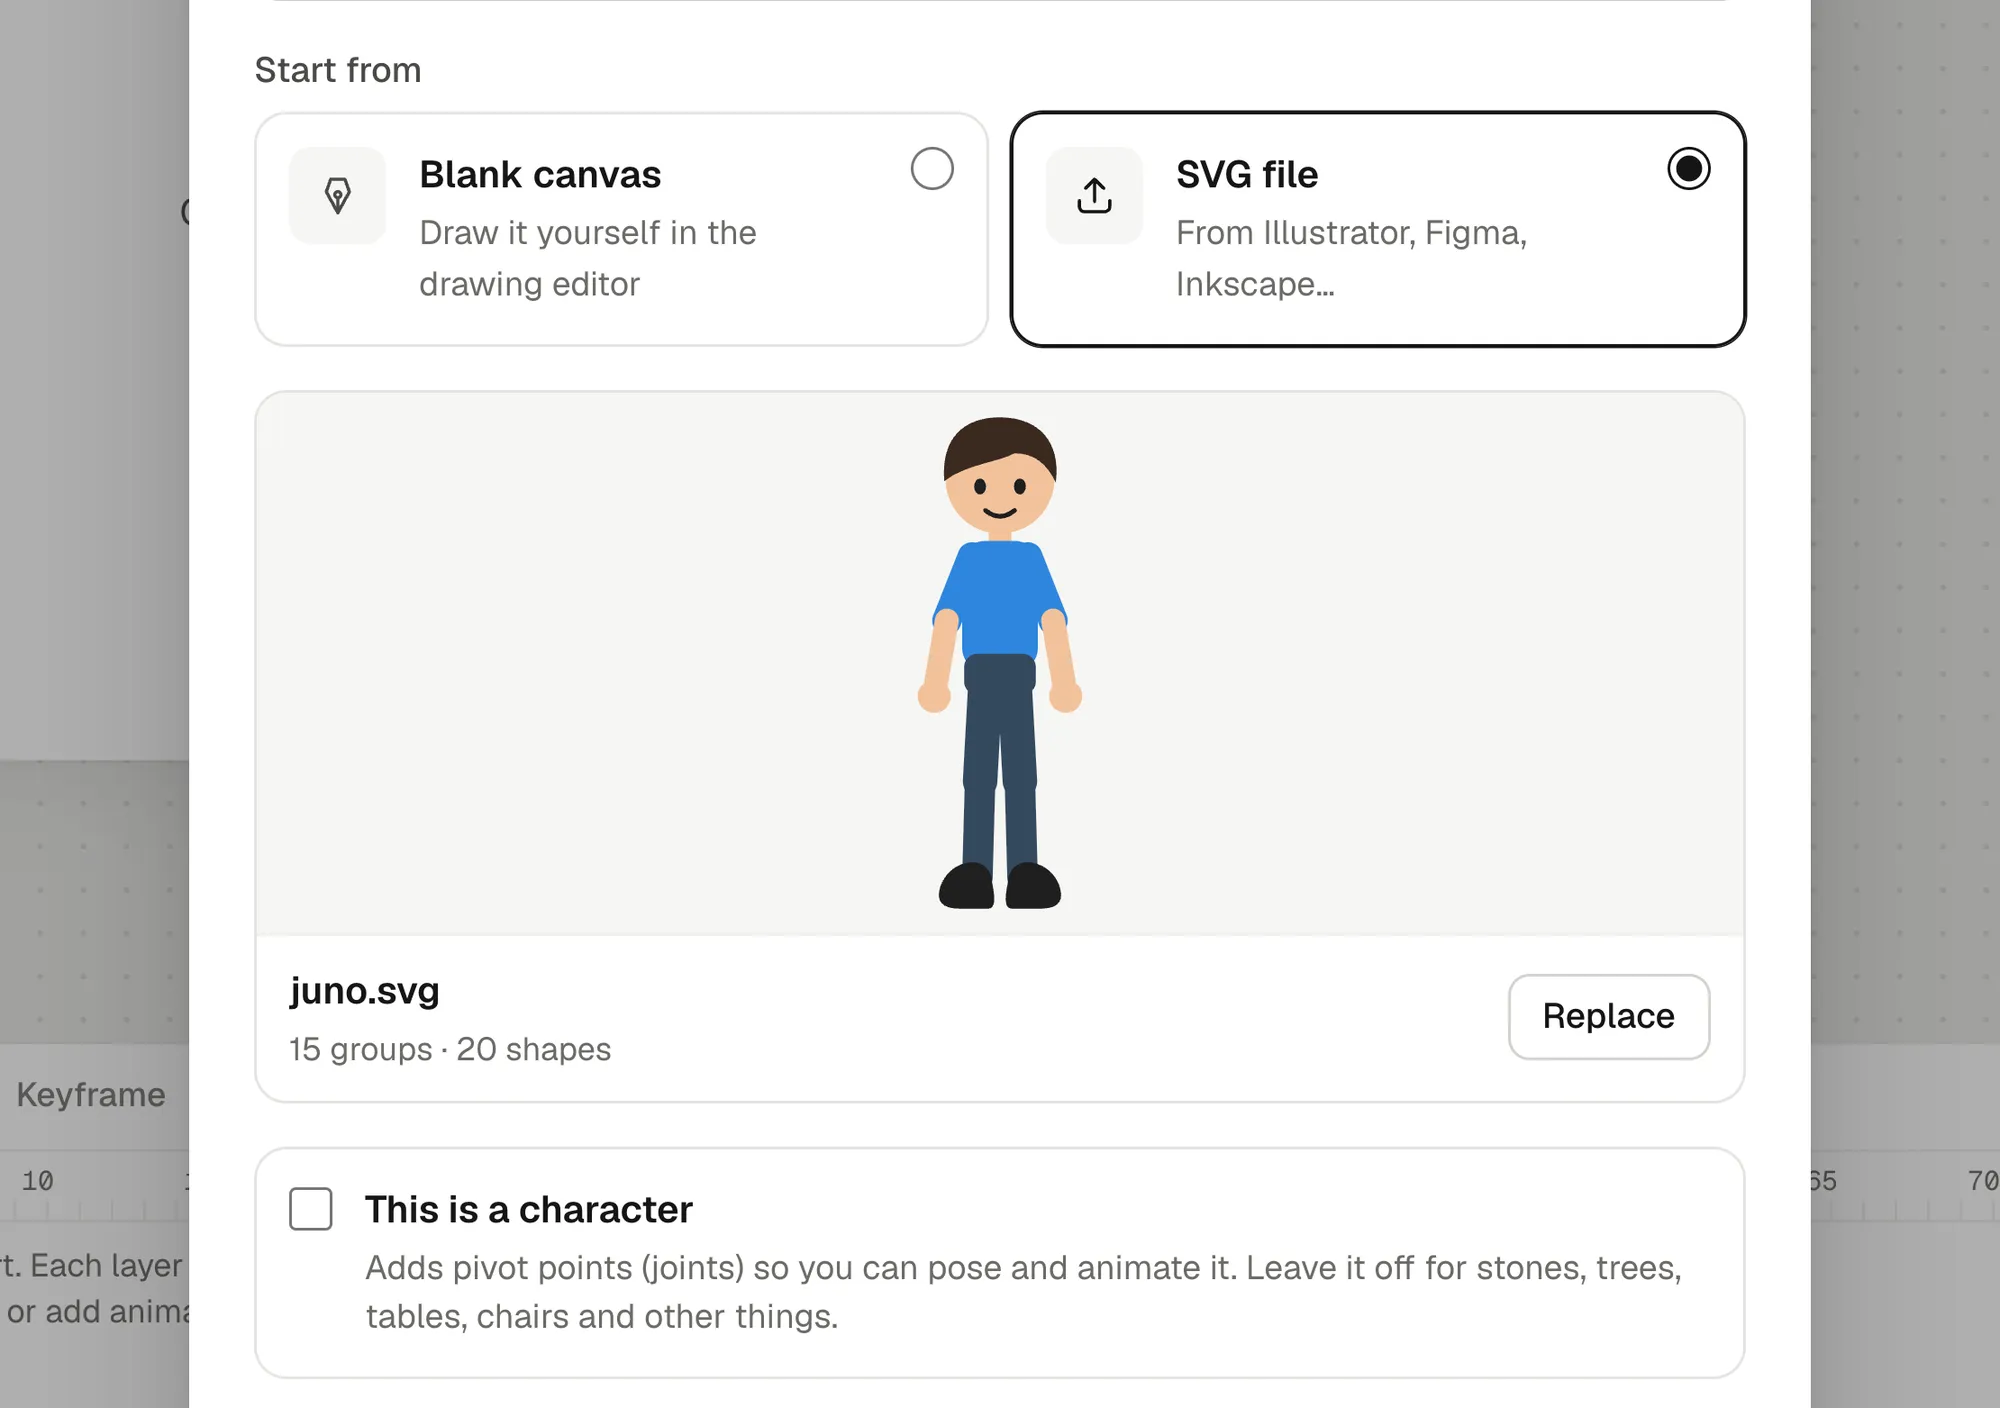
Click Open in editor. Nothing is saved until you press Save.
Step 2: make the main part first
In the list on the left, open the ⋯ menu of the group that should move the whole character, here Body, and pick Make as body part. The first part turns the drawing into a character.
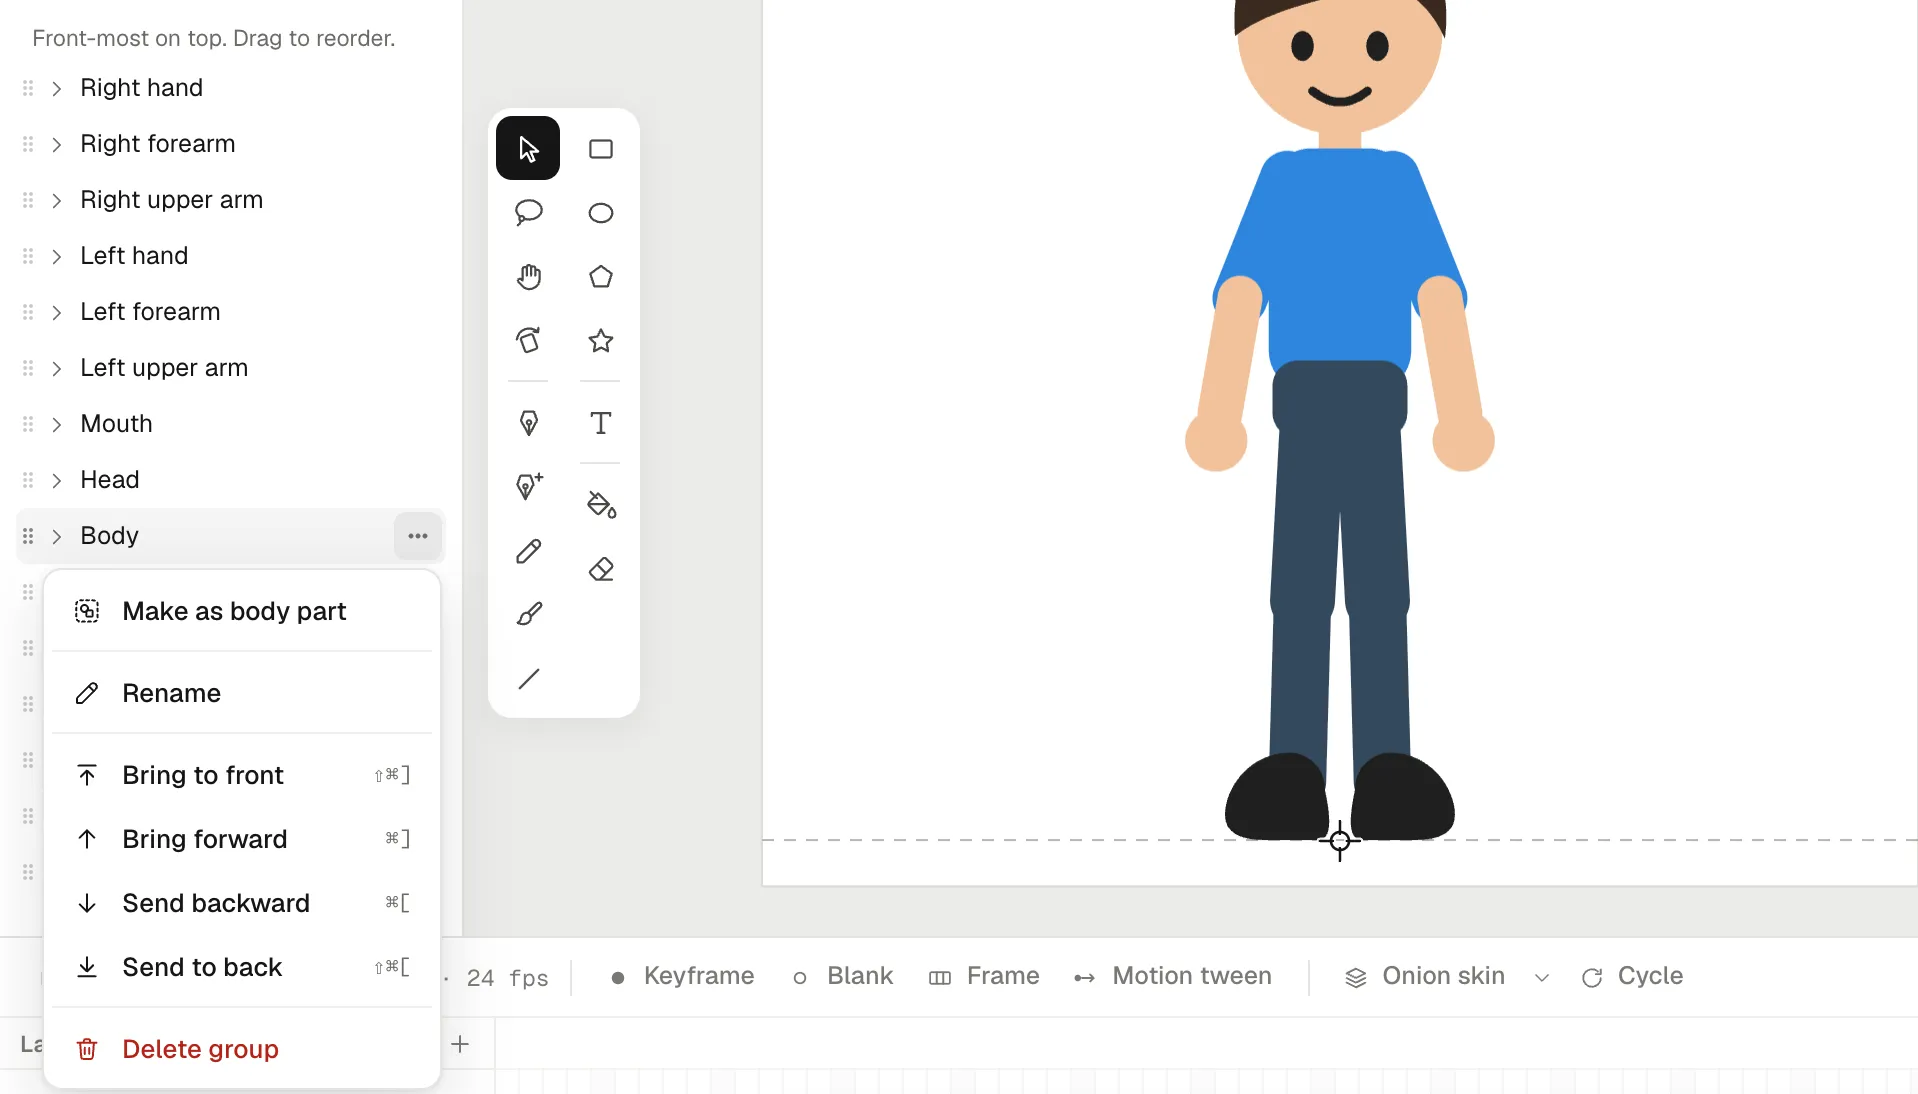
Step 3: make the other parts, parent by parent
Go through the rest of the groups the same way. In the dialog, check two fields:
- Kind: what the part is. It’s filled in from the name, so Left forearm becomes a forearm.
- Attached to: its parent. Upper arms and thighs hang from Body, forearms from their upper arms, hands from their forearms, shins from their thighs, feet from their shins, and the head from Body.
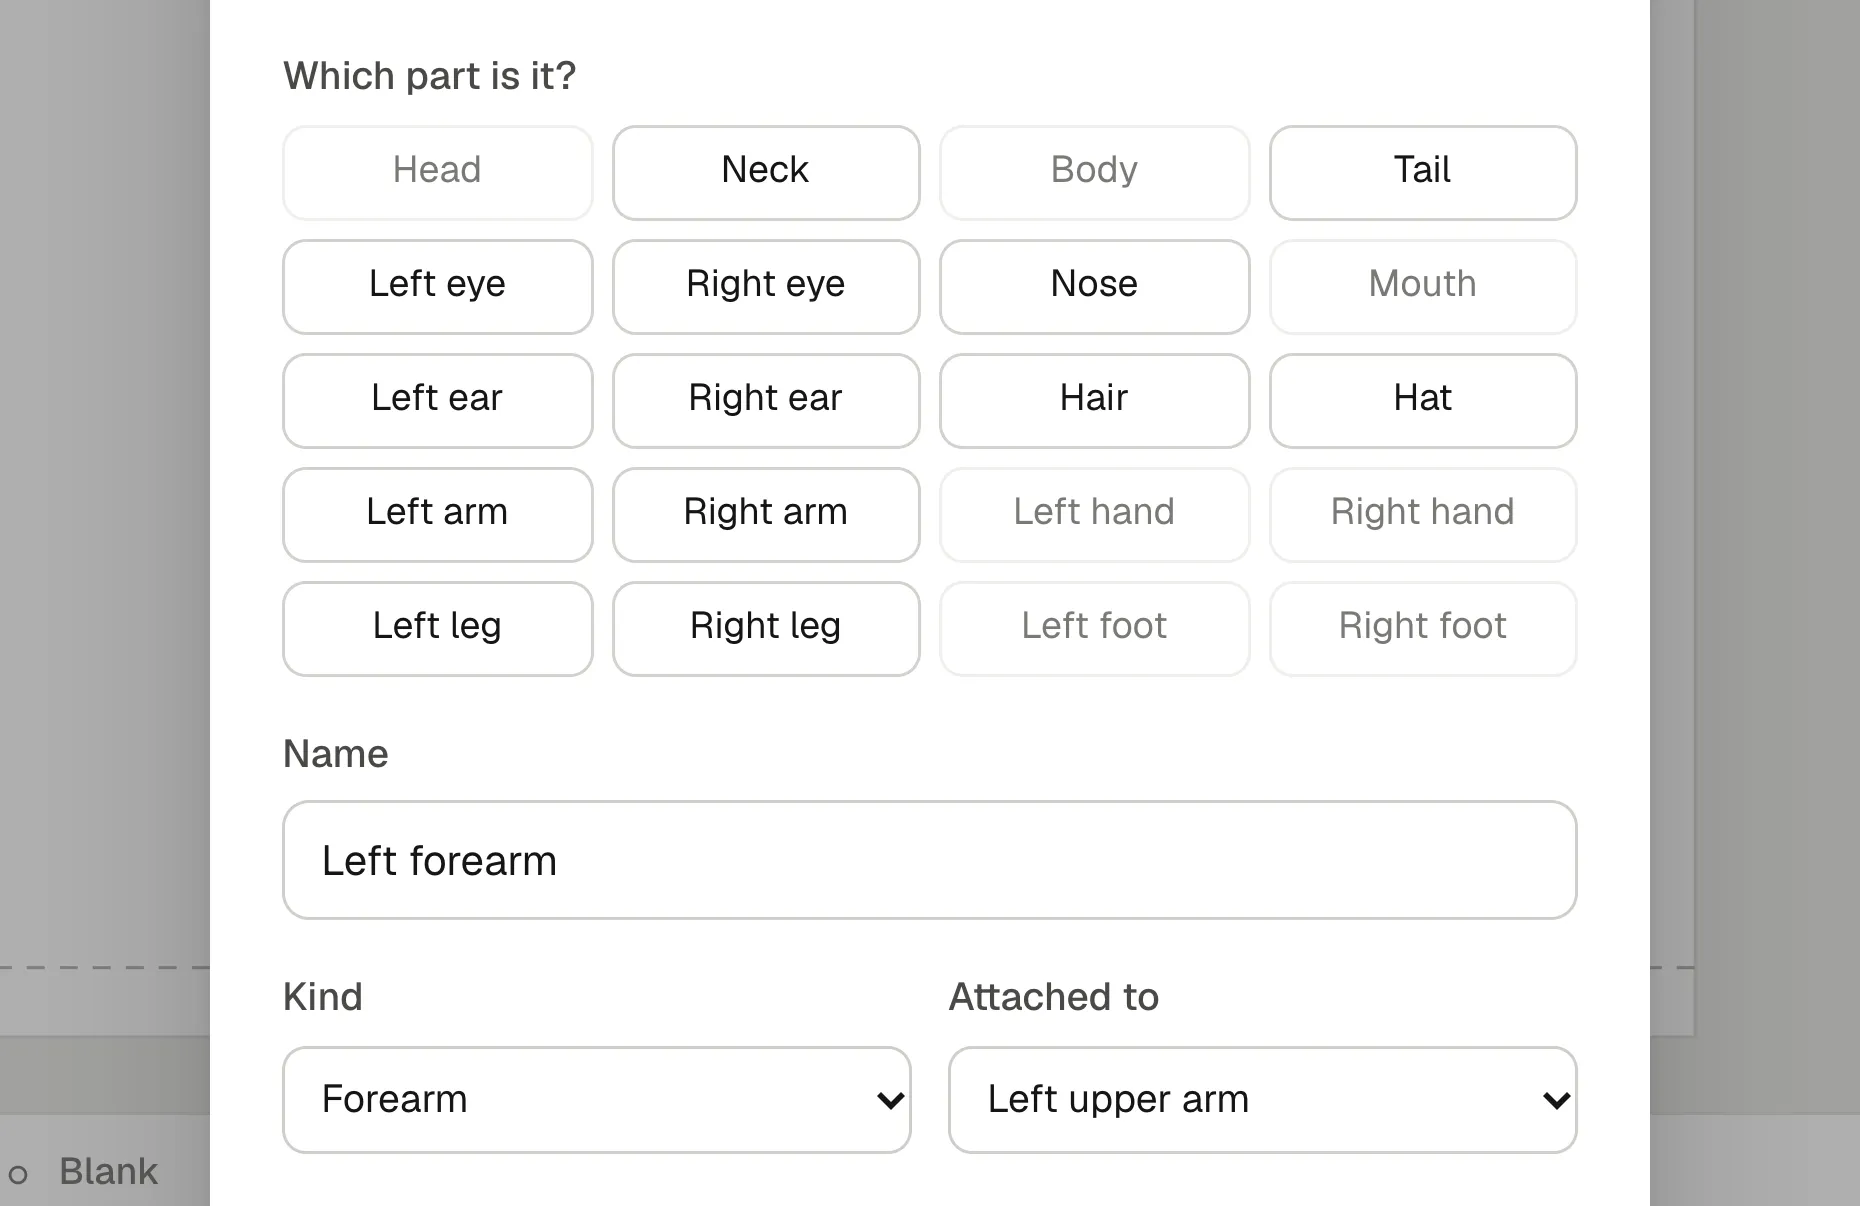
Animperia puts each joint where the part meets its parent, so most joints land close to the right spot. If your character is drawn as loose shapes rather than groups, select the shapes of one part on the canvas and press ⌘G (Ctrl+G) to open the same dialog.
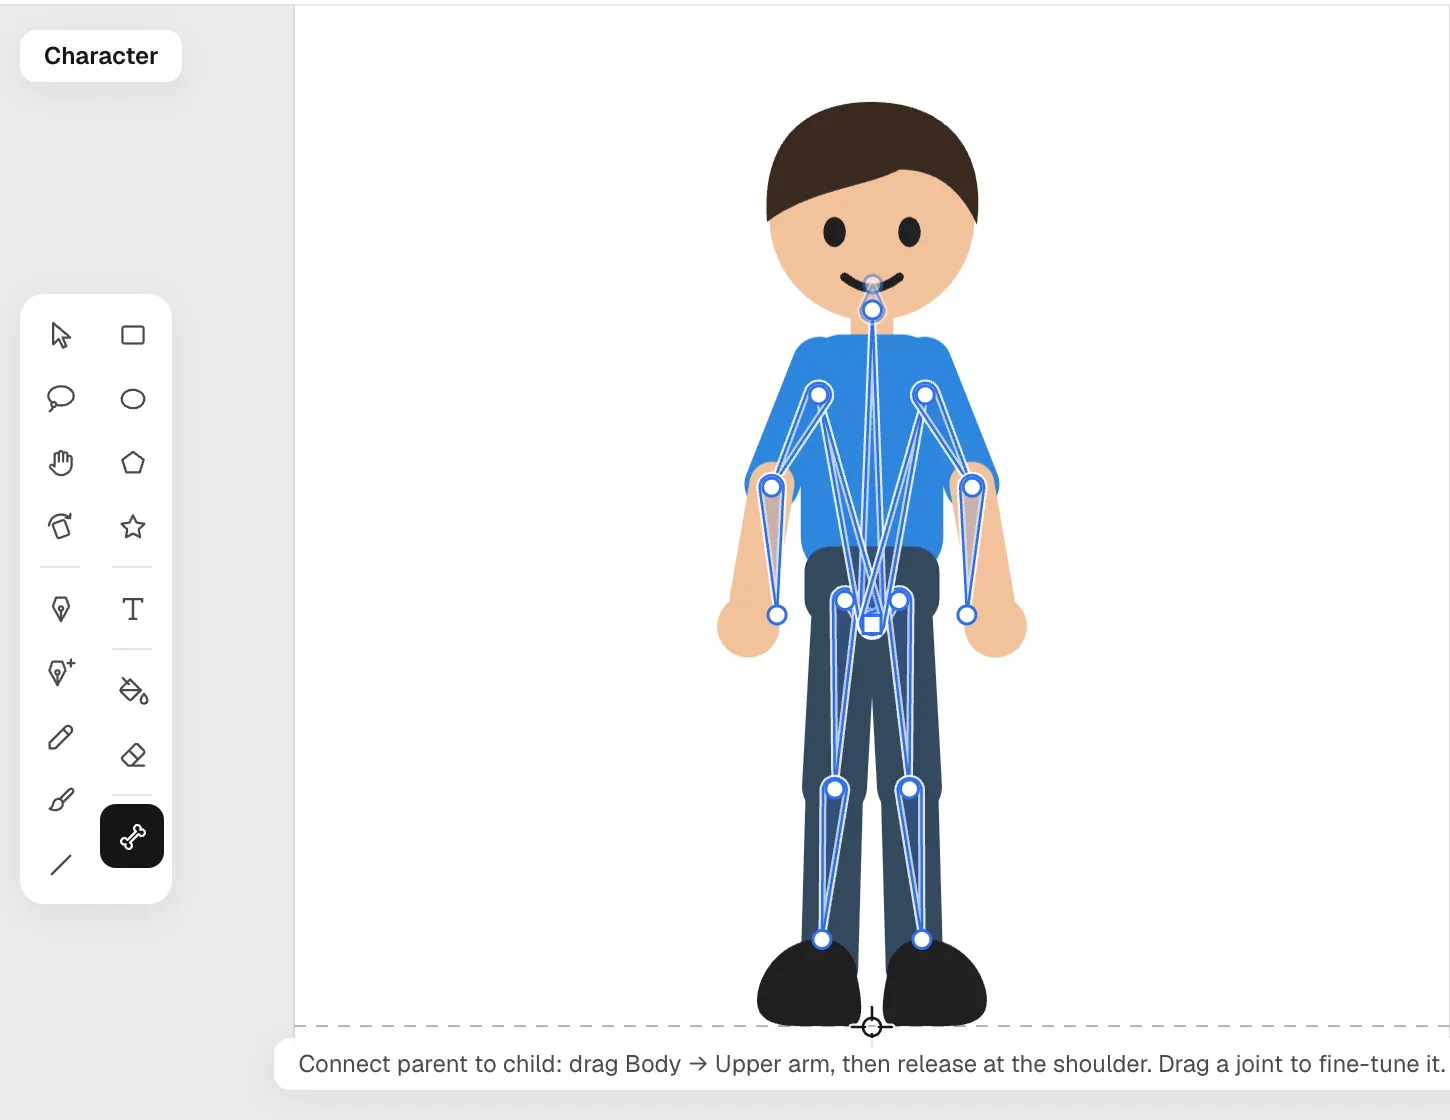
Step 4: check the joints with the Bone tool
Press M. Each part now shows a bone from its parent’s joint to its own, and the main part’s joint is a small square. Look for two things:
- A joint at the edge of a limb, not in the middle of the round end. Drag it into place.
- A part hanging from the wrong parent, such as a hand attached to the body. Drag from the right parent to the part and let go where they meet.
Step 5: run the wiggle test
Press Wiggle test and every limb swings around its joint at once. Watch the elbows, knees, wrists and ankles. A gap that opens means the ends need more overlap. A part that slides means its joint is off. Fix it, wiggle again, and press Save when it holds together.
Step 6: pose it
Press Pivots in the top bar. Drag a wrist and the whole arm bends at the shoulder and the elbow; drag an ankle and the leg follows. Drag the tip of a hand or the top of the head to turn just that part. Posed outside an animation, this becomes the rest pose.
Step 7: animate it
Under Animations on the right, click Add, choose Hands-on, give it a name and a length, and create it. The timeline opens under the drawing. We made a two-second wave:
- On frame 10, we lifted the arm with the wrist handle, and set the exact angles in the panel on the right.
- On frames 16, 22, 28 and 34, we turned the forearm back and forth.
- On frame 48, we put the arm back down.
Every frame in between follows on its own, easing from one pose to the next.
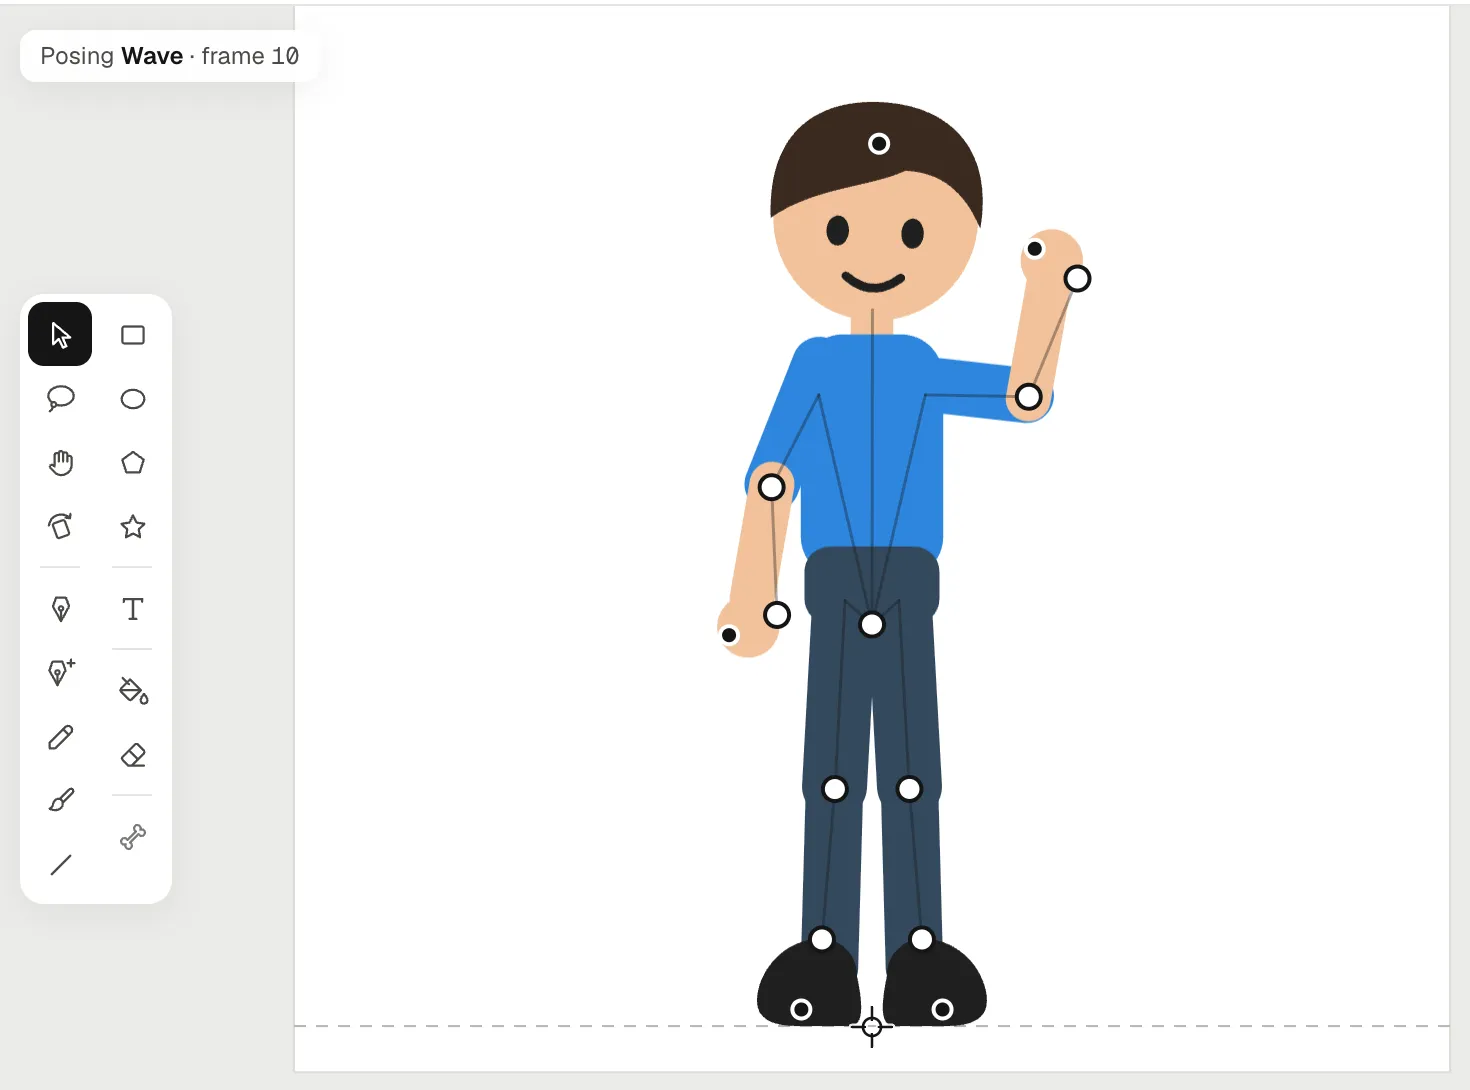
To use it, drag Juno from the library onto a scene, right-click Juno on the scene’s timeline and pick Animate: Wave. See 2D rigging in Animperia for everything the rig can do once it’s built.
Questions
How many parts should a rig have?
As few as the motion needs. A talking head for a podcast cartoon may need five parts. A character who fights, dances and climbs needs all 14 and a separate face. You can always add a part later.
Can I rig a character that isn’t a person?
Yes. Rigging doesn’t care about anatomy: a fish needs a body, fins and a tail, a lamp needs a base, an arm and a shade. In Animperia, give the parts names of your own and pick Other as the kind where nothing fits. For talking objects, see our guide on how to make an object show.
Can I export the rig to a game engine?
Not from Animperia. As of October 2026 it exports videos, GIFs and images, and a whole project as one .animperia file for Animperia itself. There’s no SVG or skeleton export yet.
Do I need a drawing tablet?
No. Cutting parts, placing joints and posing are all clicks and drags, so a mouse or a trackpad is enough. A tablet helps only if you want pressure in your brush strokes.